The Official freeCodeCamp Language Lead Handbook
This handbook will help you set up and use the tools for your localization efforts.
How to Invite New Contributors to Ghost
Section titled “How to Invite New Contributors to Ghost”Ghost allows you to set contributors with different levels of authorization.
Most of your invites will be for the “Contributor” level. This level allows the user to create drafts. Select this role when inviting a new translator.
The “Author” level allows the user to create Drafts and publish them.
The “Editor” level allows the user to access all Drafts and publish them. Select this role when inviting a new proofreader.
The “Administrator” level is reserved for freeCodeCamp staff and Language Leads.
How are the Articles Built
Section titled “How are the Articles Built”We use a JAMStack-based approach to build and deploy the articles. This strategy makes for a speedy static site cached and served from a CDN.
Ghost acts as our content management platform, and 11ty builds the articles into static assets – plain HTML, JavaScript, and CSS. Only these static assets are deployed to our servers.
This process is automated and runs periodically. If you publish something now, it will be available on the news site in a few hours.
You can find the up-to-date build schedules and status here: https://github.com/freeCodeCamp/news#build
How to Mention the Original Author of a Translated Article
Section titled “How to Mention the Original Author of a Translated Article”The original author and the original article are linked automatically adding this code to the Code Injection -> head section in the Draft Settings on Ghost.
<script> const fccOriginalPost = 'link';</script>With link being the link of the original article.
How to set up the auto-translation workflow for a new language
Section titled “How to set up the auto-translation workflow for a new language”- Add the prompt that you want to give to the OpenAI API
- Add the GitHub issue template and the CODEOWNERS configuration
Add prompt
Section titled “Add prompt”- Clone the repository freeCodeCamp/articles-auto-translate-action
- Run
pnpm install - Add the prompt in src/tasks/task_auto_translate_step_02_trans_articles.ts file as shown in the image below
- Run
pnpm run build. This will updatedist/index.js - Open a pull request including the modified files (
src/tasks/task_auto_translate_step_02_trans_articles.tsanddist/index.js)
The prompt should say something similar to below. You can customize the prompt to get the best result for your language.
I have an md file, please translate it into [Language]. The translation must strictly maintain the format and layout of the original markdown file. Please provide the translation directly without asking questions.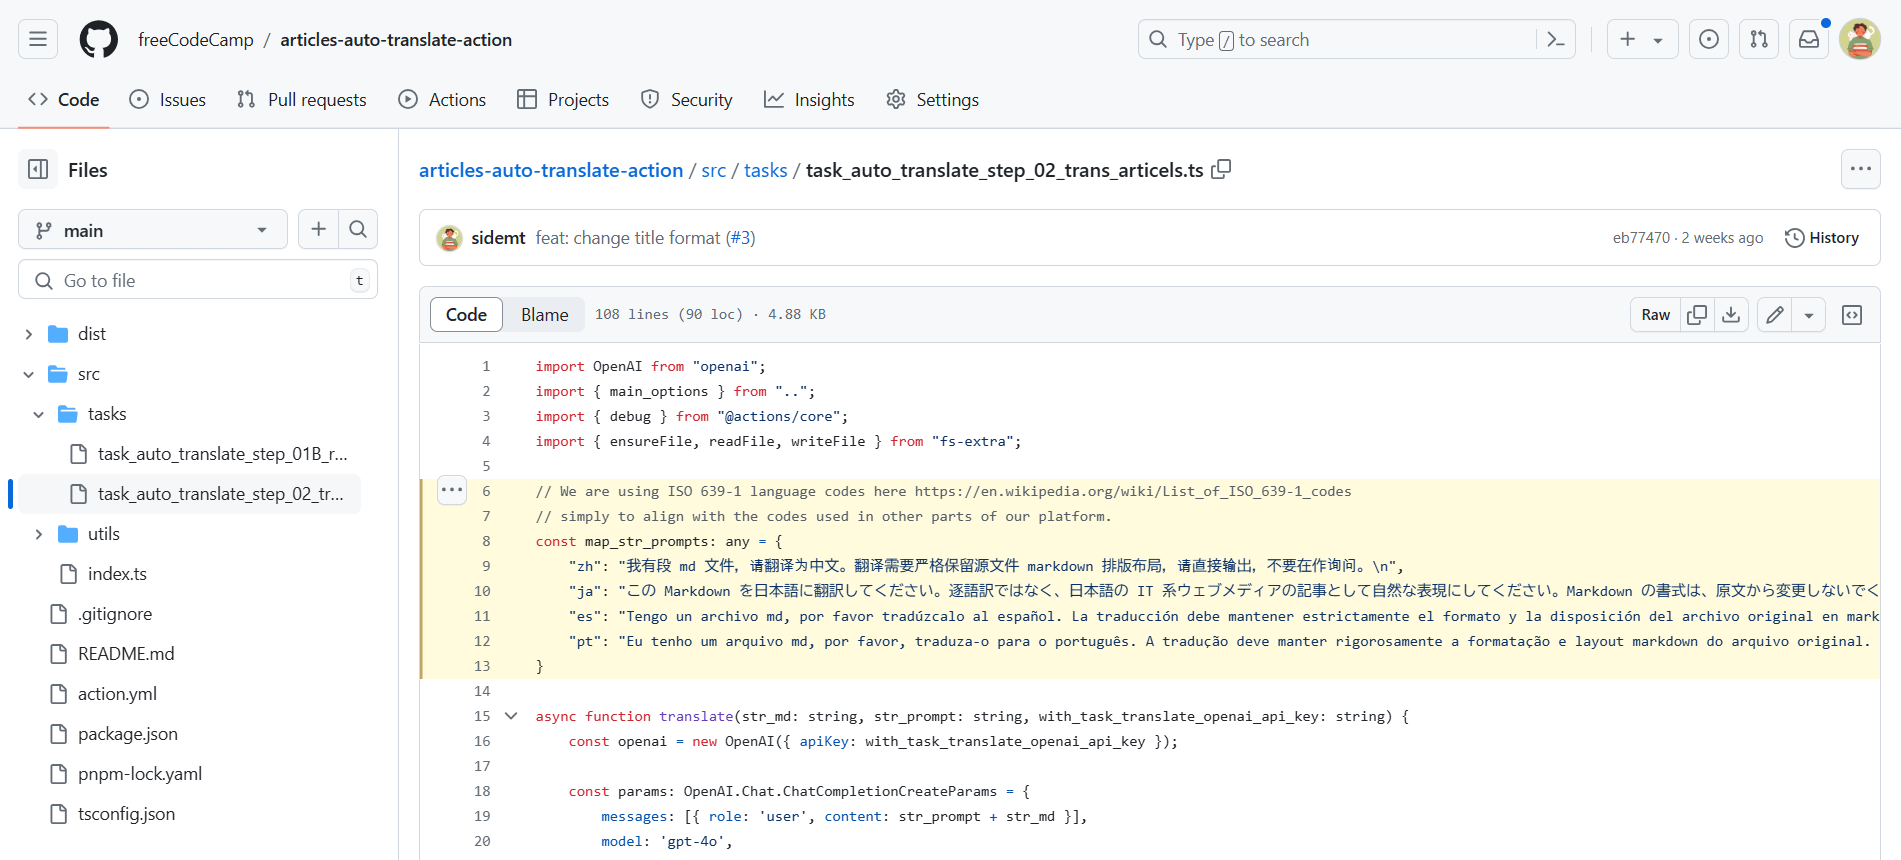
Add issue template and update CODEOWNERS
Section titled “Add issue template and update CODEOWNERS”- Clone the repository freeCodeCamp/news-translation-tasks
- The issue template files are in .github/ISSUE_TEMPLATE directory
- Add the file for your language. Make sure to use the language code that matches with the key you added in the prompt object above, as shown in the image below
- Update the file .github/CODEOWNERS to add the new language
- Open a pull request
The issue template should look like this:
---name: Translation Task (Machine Translation)about: "Add new articles to be translated and automatically crawled using automatic GitHub Actions."title: "[<2-letter language code>] (Put the translated title here)"sidebar:  label: "Language Lead Handbook"labels: ["<language>"]assignees: ''---
[Original Title](https://example.com/path/to/your/article/)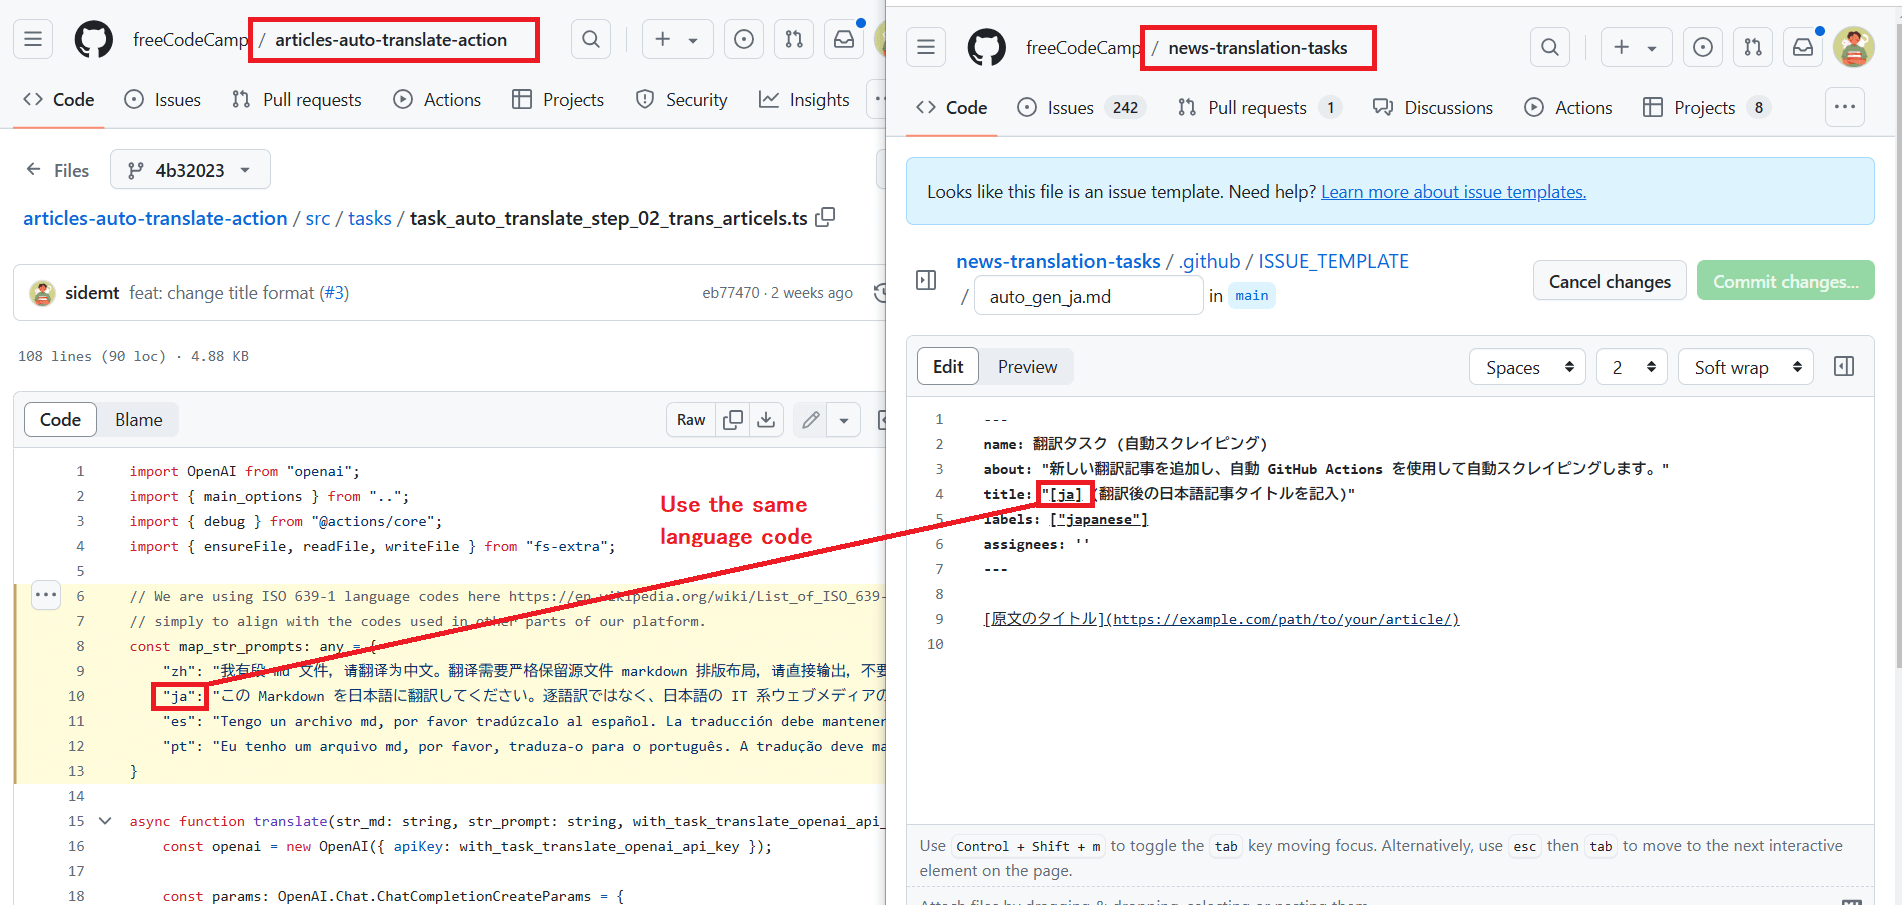
The CODEOWNERS file should look like this:
# -------------------------------------------------# Files that need attention from each language lead# -------------------------------------------------
/articles/es/*.md @RafaelDavisH/articles/ja/*.md @sidemt...
Add a line in the following format: /articles/<2-letter language code>/*.md @<username of the language lead>
This way, the language lead can get notified when someone opens a PR for the translation files for that language.
How to start the auto-translation workflow
Section titled “How to start the auto-translation workflow”After the two pull requests are merged, you can start using the auto-translation workflow.
In this workflow, each GitHub issue corresponds to an article to be translated.
-
Go to freeCodeCamp/news-translation-tasks repository
-
Click “New issue”
-
Click “Get started” button for your language to open the issue template
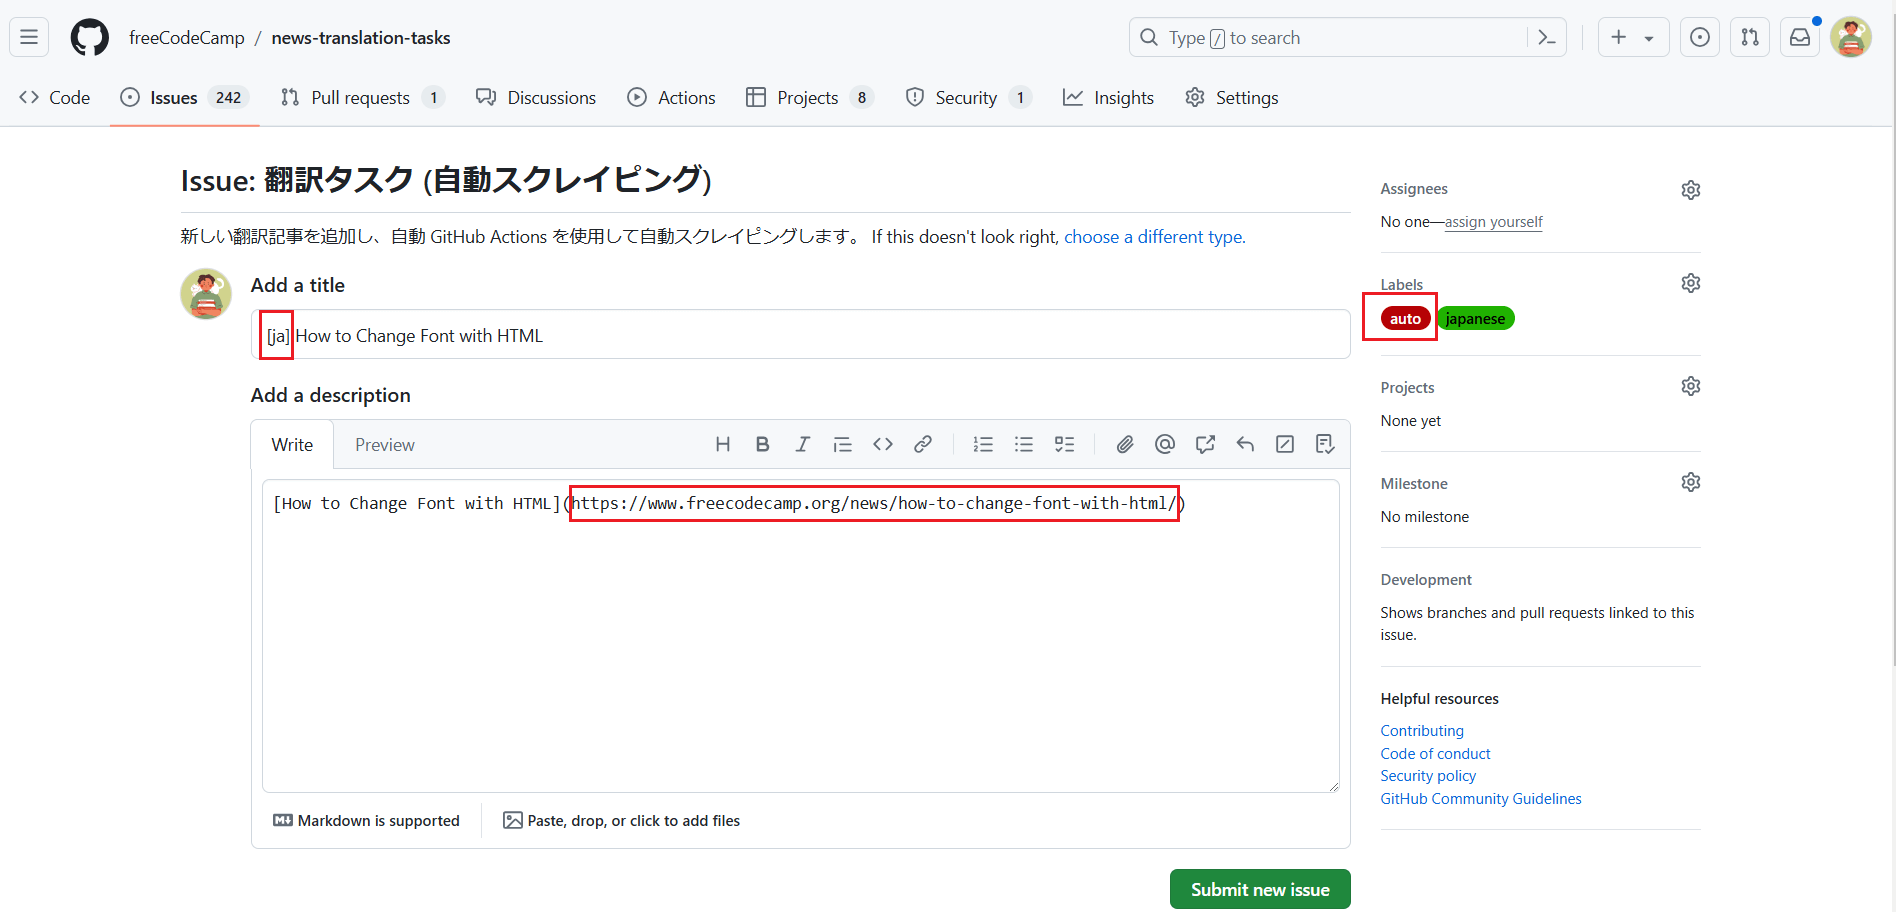
The minimum requirements to use the workflow are as follows:
- 2-letter language code in the square brackets at the beginning of the issue title
- URL of the English article in the description as a link
autolabel
Additional information:
- When you just paste the URL, GitHub automatically converts it into a link so it works too. You don’t necessarily have to make it a markdown link in title format.
- You need to add
autolabel manually, since this step works as a permission check. Only users with “Triage” role or higher can add labels. We usually invite new contributors as “Read” role, so they can’t trigger auto-translation workflow. - If you forget to add the
autolabel when creating an issue, you can add it later. You can also restart the workflow by removing and adding theautolabel.
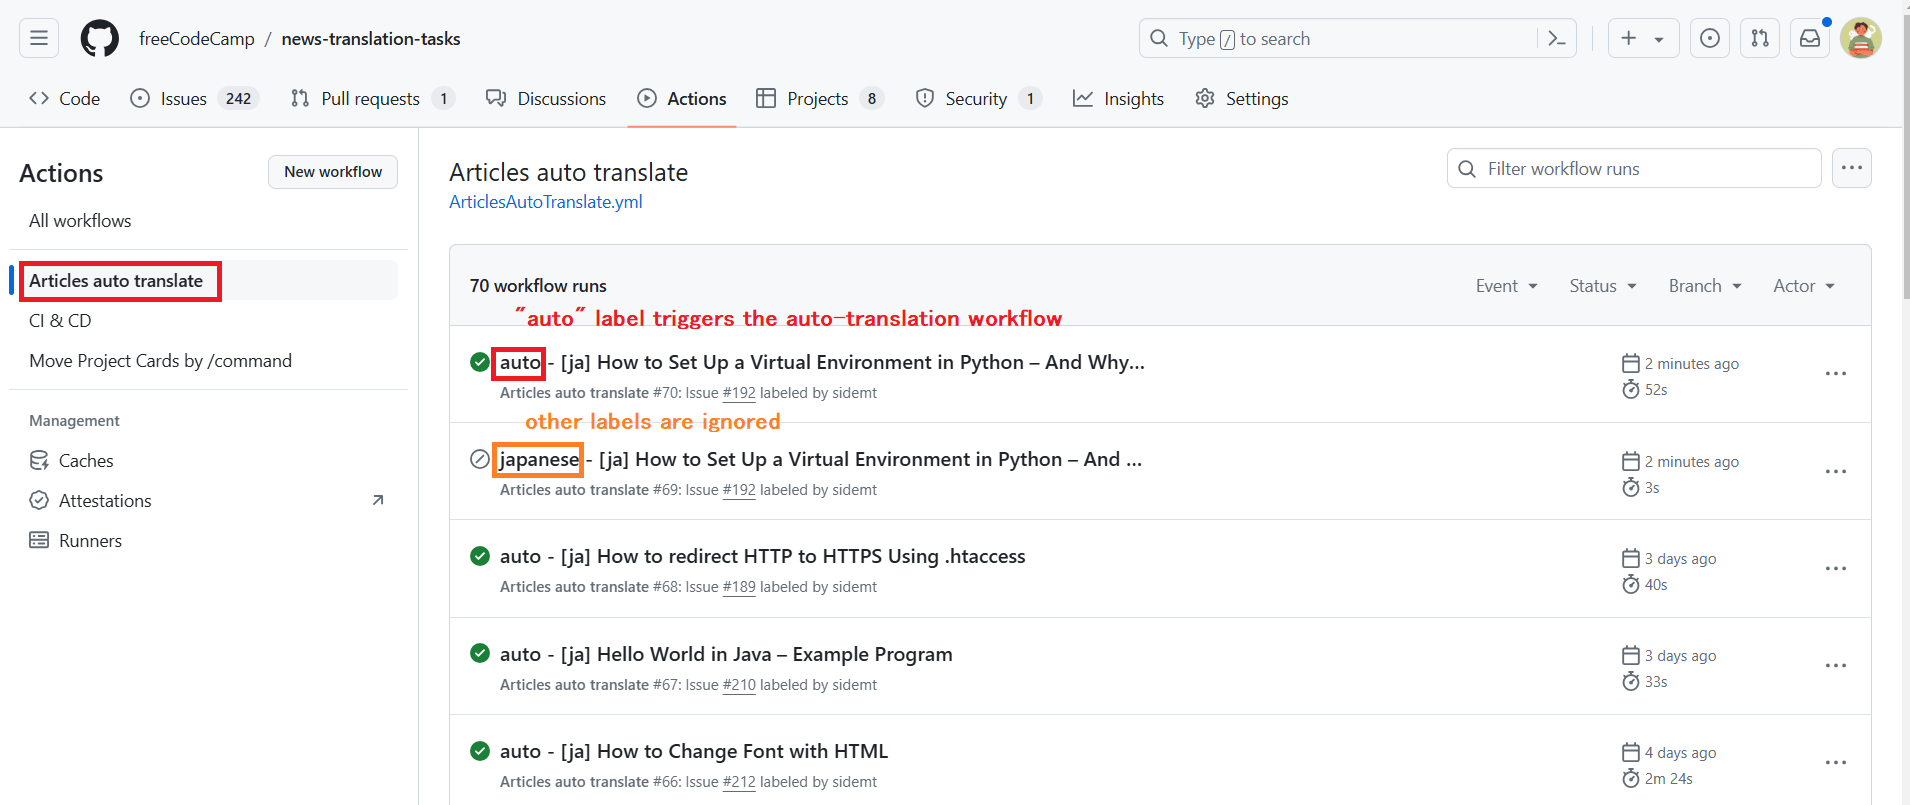
- When the
autolabel is added to an issue, the auto-translation workflow is triggered. You can check the status of the workflow run in the “Actions” tab.
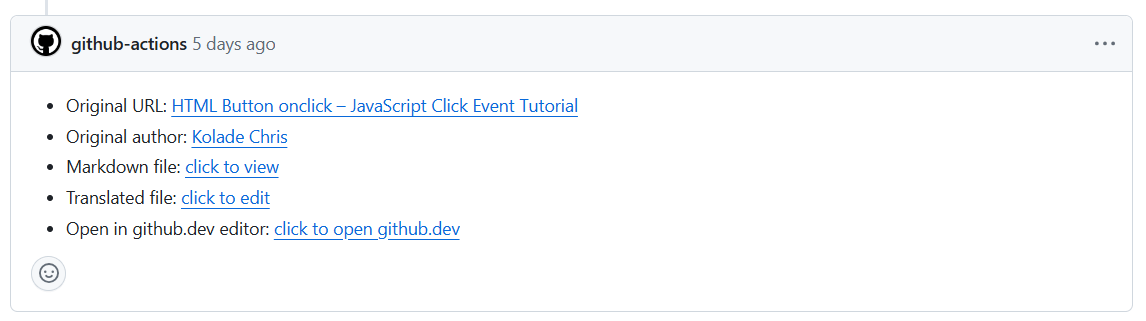
- When the workflow run is complete, it adds an issue comment like below. It is ready for contributors to start post-editing.
How to Update Trending Articles
Section titled “How to Update Trending Articles”To update the trending articles in the footer, you need to update the yaml file in the CDN repository for your language. Both the curriculum and the publication reference this file.
For example, here is the file content for the first 6 articles:
article0title: 'Unire CSV con Python'article0link: 'https://www.freecodecamp.org/italian/news/come-combinare-file-multipli-in-formato-csv-con-8-righe-di-codice/'article1title: 'Il comando Git push'article1link: 'https://www.freecodecamp.org/italian/news/il-comando-git-push-spiegato/'article2title: 'Centrare immagini in CSS'article2link: 'https://www.freecodecamp.org/italian/news/come-centrare-un-immagine-usando/'article3title: 'I codici Alt'article3link: 'https://www.freecodecamp.org/italian/news/codici-alt/'article4title: 'Tenere a bada il footer'article4link: 'https://www.freecodecamp.org/italian/news/come-mantenere-il-footer-al-suo-posto/'article5title: 'Cosa è API?'article5link: 'https://www.freecodecamp.org/italian/news/cose-un-api-in-italiano-per-favore/'Each number represents one of the 30 articles in the footer. Make sure to match the title and the link correctly.
For each article, you will need to create a shorter title to use in the footer. Each title must stay on a single line and not go to a new line.
You will want to build the translated client locally to see if the titles have the right length. You can preview the changes by editing the trending.json file in your local environment:
-
Update your
.envfile to use your language forCLIENT_LOCALEandCURRICULUM_LOCALE. -
Run
pnpm -F=client run create:trending. This will automatically generate thetrending.jsonfile for your language under the/client/i18n/locales/directory. -
Start the server by running
pnpm run develop:serverin one terminal window. -
Edit the
trending.jsonto contain the titles you want to preview. You may want to convert your.yamlfile into JSON format with an automatic tool. -
In another terminal window, run
pnpm run clean:client, and thenpnpm run develop:client.
How to Translate Articles in the Footer Links
Section titled “How to Translate Articles in the Footer Links”There are some links listed at the bottom of the footer (About, Alumni Network, Open Source, etc.) and some of them can be translated into your language in the same way as other articles.
Articles that can be translated:
- About
- Support
- Academic Honesty
- Code of Conduct
The following articles should not be translated:
- Shop
- Sponsors
- Privacy Policy
- Terms of Service
- Copyright Policy
The following links are pointing to external sites and cannot be translated:
- Alumni Network
- Open Source
Change the Footer Links in the News
Section titled “Change the Footer Links in the News”Once you have translated and published the articles listed as “can be translated” above, you can update the links in the footer for /news by editing the file at news/config/i18n/locales/<your language>/links.json in the freeCodeCamp/news repository.
Update the following part in the file:
{ ... "footer": { "about": "https://www.freecodecamp.org/news/about/", "support": "https://www.freecodecamp.org/news/support/", "honesty": "https://www.freecodecamp.org/news/academic-honesty-policy/", "coc": "https://www.freecodecamp.org/news/code-of-conduct/" }}Change the Footer Links in the Curriculum
Section titled “Change the Footer Links in the Curriculum”When you have translated and published the articles listed as “can be translated” above, as well as when the curriculum in your language is ready for launch, you can update the links in the footer for /learn by editing the file at client/i18n/locales/<your language>/links.json in the freeCodeCamp/freeCodeCamp repository.
Update the following part in the file:
{ ... "footer": { "about-url": "https://www.freecodecamp.org/news/about/", "shop-url": "https://www.freecodecamp.org/shop/", "support-url": "https://www.freecodecamp.org/news/support/", "sponsors-url": "https://www.freecodecamp.org/news/sponsors/", "honesty-url": "https://www.freecodecamp.org/news/academic-honesty-policy/", "coc-url": "https://www.freecodecamp.org/news/code-of-conduct/", "privacy-url": "https://www.freecodecamp.org/news/privacy-policy/", "tos-url": "https://www.freecodecamp.org/news/terms-of-service/", "copyright-url": "https://www.freecodecamp.org/news/copyright-policy/" }, ...}How to Translate the Info Boxes Headers in the Documentation
Section titled “How to Translate the Info Boxes Headers in the Documentation”You can find these boxes all around the documentation:
By default, their headers appear in English even in the translated docs.
You can have the headers translated in the docs in your language by changing the file docs/index.html, in this way:
Inside the script element there is an object, find the flexibleAlerts property, which has this shape:
flexibleAlerts: { note: { label: { '/': 'Note' } }, tip: { label: { '/': 'Tip' } }, warning: { label: { '/': 'Warning' } }, attention: { label: { '/': 'Attention' } }}Inside the object of the label property, before the '/' property, you would add a new property for your language, like /i18n/<language>/.
For example, adding the translations for Portuguese would appear like this:
flexibleAlerts: { note: { label: { '/i18n/portuguese/': 'Observação', '/': 'Note' } }, tip: { label: { '/i18n/portuguese/': 'Dica', '/': 'Tip' } }, warning: { label: { '/i18n/portuguese/': 'Aviso', '/': 'Warning' } }, attention: { label: { '/i18n/portuguese/': 'Atenção', '/': 'Attention' } }}How to Translate the Motivational Quotes
Section titled “How to Translate the Motivational Quotes”The motivational quotes can be found in the curriculum repository in the /client/i18n/locales/<language>/motivation.json file.
This file has a general structure of:
{ "compliments": [], "motivationalQuotes": []}The compliments are the short sentences that appear at the completion of a challenge.
You don’t need to directly translate the sentences used in English, you can write a set of short sentences that are appropriate to show at the completion of a challenge.
The compliments array is an array of strings. So, for example, you would write:
{ "compliments": ["A tutta birra!", "Pikachu, scelgo te!"], "motivationalQuotes": []}The motivational quotes are the quotes that appear at https://freecodecamp.org/learn.
The motivationalQuotes array is an array of objects, these objects should include a quote property and an author property. like this:
{ "compliments": [], "motivationalQuotes": [ { "quote": "Se i costruttori costruissero come i programmatori programmano, il primo picchio che passa potrebbe distruggere la civiltà.", "author": "Artur Bloch, Seconda legge di Weinberg" }, { "quote": "I bravi programmatori sanno cosa scrivere. I migliori sanno cosa riscrivere.", "author": "Eric Steven Raymond" } ]}How to Update the Common Links
Section titled “How to Update the Common Links”We maintain a file of common links used throughout our curriculum site in the /client/i18n/locales/<language>/links.json file.
Some of these links will not change - but you should update the /news article links to point to your language’s translated version of that article when it is published.
You should also update the help categories to point to your language’s subforum (usually language/category, like Italiano/HTML-CSS). This will allow campers to create “help posts” in the correct forum location.
How to Update the Site Meta-Data
Section titled “How to Update the Site Meta-Data”The site meta-data is in the /client/i18n/locales/<language>/meta-tags.json file. This file has five keys: title, description, social-description, keywords, and youre-unsubscribed.
The youre-unsubscribed value should be directly translated. The other values will need to be translated as closely as possible, while also considering common search terms and phrases used in your language.
If you need help with this, reach out to us in the contributor chat
Pre-Translate Workflow on Crowdin
Section titled “Pre-Translate Workflow on Crowdin”The Pre-Translate workflow can be used to apply translations from the Translation Memory to strings.
You can find the Pre-Translation workflow at the top of the page in the console of a project. If you see “Go to console” in the upper right corner, click there first.

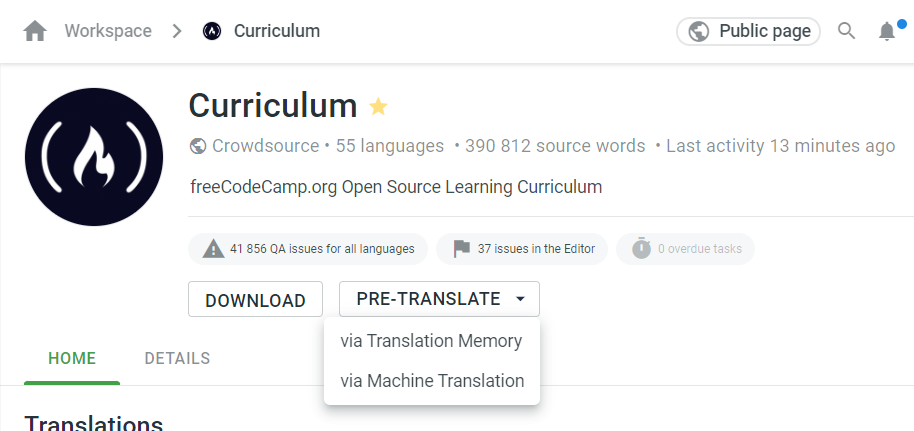
You can choose “From Machine Translation” or “From Translation Memory”. Choose “Translation Memory” to recover translations from memory.
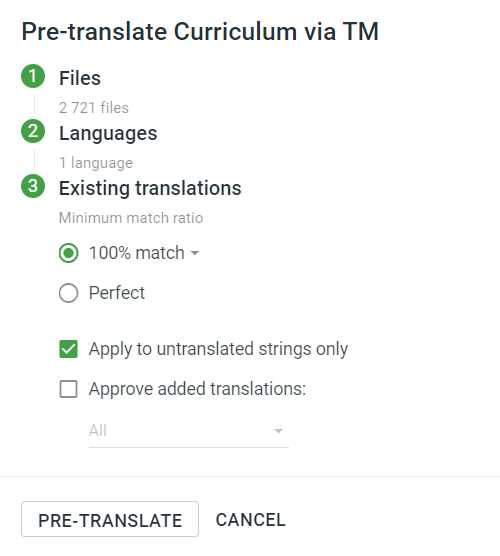
Then there are three steps to complete:
- Files. Choose which files to translate, you can do all the projects, or specific folders or files.
- Languages. Set your language here.
- Existing Translations. The best combination here is “100% match” and “Apply to untranslated strings only”. Do not approve automatically, as it’s always best to have a human eye on things.
When you have finished setting this, press the Pre-Translate button and wait. It will alert you once it has finished. The time it takes depends on how many untranslated strings are in the chosen files.
How to Update Crowdin Glossary
Section titled “How to Update Crowdin Glossary”The Crowdin Glossary is kept in the crowdin-glossaries repository.
In the glossaries folder, there are various *.csv (comma,separated values) files, one for each of the crowdin projects that have a glossary that can be updated from this workflow.
The client.csv file is for the Learn User Interface project, the curriculum.csv file is for the Coding Curriculum project, the docs.csv file is for the Contributing Documentation project.
To update the Crowdin Glossaries, you need to clone this repo locally. Open the .csv file with an appropriate program, for example, Microsoft Excel.
In the .csv file you will find that the English language occupies the first three columns, Term:English is the column for the English term, Description:English is the column for the English description, and Part:English is for the part of speech (e.g., noun, verb etc.) of the term.
Then, each target language has two columns. If you translate to Dothraki, you will be interested in the columns Term:Dothraki and Description:Dothraki. The column Term:Dothraki is for the translation of the term in Dothraki, and the column Description:Dothraki is for a description of the term in Dothraki.
After you have made the changes and saved the file, you will need to make a PR with the proposed changes. After the PR is accepted, you will need to run the GitHub Action workflow to update the Crowdin Glossary. Your glossary changes will not have immediate effects, but they will come.
How to Promote a Contributor to Proofreader
Section titled “How to Promote a Contributor to Proofreader”If you consider that a contributor could become a Crowdin Proofreader, you can give the proofreader role to them this way:
In Crowdin, individuate the User management on the left-hand side menu.
This will open the user management tools, you will be able to see the list of all the users.
Search for the user who will become a proofreader. Use the three dots menu on the user row to open a menu and select “Add to team”. The proofreader teams have a standard name of Proof Readers (<language>), you can search the team using the language name. Once you have selected the team, use the “ADD” button at the bottom of the page to finalize the thing.
The user is now a proofreader.
How to Add or Update a Language
Section titled “How to Add or Update a Language”Check out the how to enable new language docs. If you are updating a language the section on set translated superblocks should be helpful.