
DevOps Handbook
This guide will help you understand our infrastructure stack and how we maintain our platforms. While this guide does not have exhaustive details for all operations, it could be used as a reference for your understanding of the systems.
Let us know if you have feedback or queries and we will be happy to clarify.
Flight Manual - Code Deployments
This repository is continuously built, tested, and deployed to separate sets of infrastructure (Servers, Databases, CDNs, etc.).
This involves three steps to be followed in sequence:
- New changes (both fixes and features) are merged into our primary development branch (
main) via pull requests. - These changes are run through a series of automated tests.
- Once the tests pass we release the changes (or update them if needed) to deployments on our infrastructure.
Building the codebase - Mapping Git Branches to Deployments
Typically, main (the default development branch) is merged into the prod-staging branch once a day and is released into an isolated infrastructure.
This is an intermediate release for our developers and volunteer contributors. It is also known as our “staging” or “beta” release.
It is identical to our live production environment at freeCodeCamp.org, other than it using a separate set of databases, servers, web-proxies, etc. This isolation lets us test ongoing development and features in a “production” like scenario, without affecting regular users of freeCodeCamp.org’s main platforms.
Once the developer team @freeCodeCamp/dev-team is happy with the changes on the staging platform, these changes are moved every few days to the prod-current branch.
This is the final release that moves changes to our production platforms on freeCodeCamp.org.
Testing changes - Integration and User Acceptance Testing
We employ various levels of integration and acceptance testing to check on the quality of the code. All our tests are done through software like GitHub Actions CI and Azure Pipelines.
We have unit tests for testing our challenge solutions, Server APIs, and Client User interfaces. These help us test the integration between different components.
Together these tests help in preventing issues from repeating themselves and ensure we do not introduce a bug while working on another bug or a feature.
Deploying Changes - Pushing changes to servers
We have configured continuous delivery software to push changes to our development and production servers.
Once the changes are pushed to the protected release branches, a build pipeline is automatically triggered for the branch. The build pipelines are responsible for building artifacts and keeping them in a cold storage for later use.
The build pipeline goes on to trigger a corresponding release pipeline if it completes a successful run. The release pipelines are responsible for collecting the build artifacts, moving them to the servers, and going live.
The statuses of builds and releases are available here.
Trigger a Build, Test, and Deploy
Currently, only members of the developer team can push to the production branches. The changes to the production-* branches can land only via fast-forward merge to the upstream.
Pushing changes to Staging Applications
-
Configure your remotes correctly.
Terminal window git remote -vResults:
origin [email protected]:raisedadead/freeCodeCamp.git (fetch)origin [email protected]:raisedadead/freeCodeCamp.git (push)upstream [email protected]:freeCodeCamp/freeCodeCamp.git (fetch)upstream [email protected]:freeCodeCamp/freeCodeCamp.git (push) -
Make sure your
mainbranch is pristine and in sync with the upstream.Terminal window git checkout maingit fetch --all --prunegit reset --hard upstream/main -
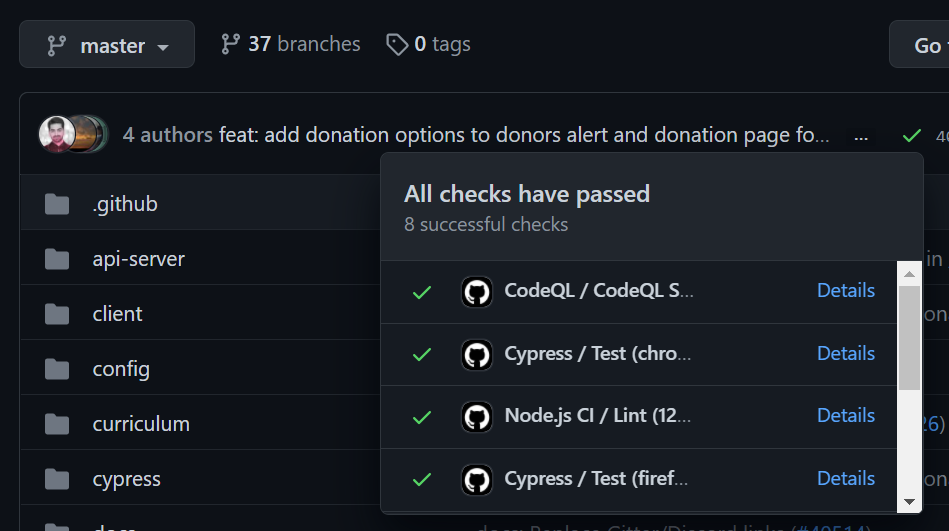
Check that the GitHub CI is passing on the
mainbranch for upstream.The continuous integration tests should be green and PASSING for the
mainbranch. Click the green check mark next to the commit hash when viewing themainbranch code.Checking status on GitHub Actions (screenshot)
If this is failing you should stop and investigate the errors.
-
Confirm that you are able to build the repository locally.
pnpm run clean-and-develop -
Move changes from
maintoprod-stagingvia a fast-forward mergegit checkout prod-staginggit merge maingit push upstream
The above steps will automatically trigger a run on the build pipeline for the prod-staging branch. Once the build is complete, the artifacts are saved as .zip files in a cold storage to be retrieved and used later.
The release pipeline is triggered automatically when a fresh artifact is available from the connected build pipeline. For staging platforms, this process does not involve manual approval, and the artifacts are pushed to the Client CDN and API servers.
Pushing changes to Production Applications
The process is mostly the same as the staging platforms, with a few extra checks in place. This is just to make sure, we do not break anything on freeCodeCamp.org which can see hundreds of users using it at any moment.
| Do NOT execute these commands unless you have verified that everything is working on the staging platform. You should not bypass or skip any testing on staging before proceeding further. |
|---|
-
Make sure your
prod-stagingbranch is pristine and in sync with the upstream.Terminal window git checkout prod-staginggit fetch --all --prunegit reset --hard upstream/prod-staging -
Move changes from
prod-stagingtoprod-currentvia a fast-forward mergegit checkout prod-currentgit merge prod-staginggit push upstream
The above steps will automatically trigger a run on the build pipeline for the prod-current branch. Once a build artifact is ready, it will trigger a run on the release pipeline.
Additional Steps for Staff Action
Once a release run is triggered, members of the developer staff team will receive an automated manual intervention email. They can either approve or reject the release run.
If the changes are working nicely and have been tested on the staging platform, then it can be approved. The approval must be given within 4 hours of the release being triggered before getting rejected automatically. A staff can re-trigger the release run manually for rejected runs, or wait for the next cycle of release.
For staff use:
| Check your email for a direct link or go to the release dashboard after the build run is complete. |
|---|
Once one of the staff members approves a release, the pipeline will push the changes live to freeCodeCamp.org’s production CDN and API servers.
Build, Test and Deployment Status
Here is the current test, build and deployment status of the codebase.
| Branch | Unit Tests | Integration Tests | Builds & Deployments |
|---|---|---|---|
main | - | ||
prod-staging | Azure Pipelines | ||
prod-current | Azure Pipelines | ||
prod-next (experimental, upcoming) | - | - | - |
Early Access and Beta Testing
We welcome you to test these releases in a “public beta testing” mode and get early access to upcoming features to the platforms. Sometimes these features/changes are referred to as next, beta, staging, etc. interchangeably.
Your contributions via feedback and issue reports will help us in making the production platforms at freeCodeCamp.org more resilient, consistent, and stable for everyone.
We thank you for reporting bugs that you encounter and help in making freeCodeCamp.org better. You rock!
Identifying the Upcoming Version of the Platforms
Currently, a public beta testing version is available at:
| Application | Language | URL |
|---|---|---|
| Learn | English | https://www.freecodecamp.dev |
| Espanol | https://www.freecodecamp.dev/espanol | |
| Chinese | https://www.freecodecamp.dev/chinese | |
| News | English | https://www.freecodecamp.dev/news |
| Forum | English | https://forum.freecodecamp.dev |
| Chinese | https://freecodecamp.dev/chinese/forum | |
| API | - | https://api.freecodecamp.dev |
Identifying the Current Version of the Platforms
The current version of the platform is always available at freeCodeCamp.org.
The dev-team merges changes from the prod-staging branch to prod-current when they release changes. The top commit should be what you see live on the site.
You can identify the exact version deployed by visiting the build and deployment logs available in the status section. Alternatively, you can also ping us in the contributors chat room for a confirmation.
Known Limitations
There are some known limitations and tradeoffs when using the beta version of the platform.
-
All data / personal progress on these beta platforms will NOT be saved or carried over to production
Users on the beta version will have a separate account from the production. The beta version uses a physically separate database from production. This gives us the ability to prevent any accidental loss of data or modifications. The dev-team may purge the database on this beta version as needed.
-
The beta platforms do not provide any assurances regarding uptime and reliability
Deployment is expected to be frequent and in rapid iterations, sometimes multiple times a day. As a result, there will be unexpected downtime at times or broken functionality on the beta version.
-
To ensure the effectiveness of the fix, it is advised not to direct regular users to this site for verification purposes.
The beta site is and always has been to augment local development and testing, nothing else. It’s not a promise of what’s coming, but a glimpse of what is being worked upon.
-
Sign in page may look different than production
We use a test tenant for freeCodeCamp.dev on Auth0, and hence do not have the ability to set a custom domain. This makes it so that all the redirect callbacks and the login page appear at a default domain like:
https://freecodecamp-dev.auth0.com/. This does not affect the functionality and is as close to production as we can get.
Reporting issues and leaving feedback
Please open fresh issues for discussions and reporting bugs.
You may send an email to dev[at]freecodecamp.org if you have any queries. As always all security vulnerabilities should be reported to security[at]freecodecamp.org instead of the public tracker and forum.
Flight Manual - Server Maintenance
As a member of the staff, you may have been given access to our cloud service providers like Azure, Digital Ocean, etc.
Here are some handy commands that you can use to work on the Virtual Machines (VM), for instance performing maintenance updates or doing general housekeeping.
Get a list of the VMs
Azure
Install Azure CLI az: https://docs.microsoft.com/en-us/cli/azure/install-azure-cli
(One-time) Install on macOS with
homebrew:
brew install azure-cli(One-time) Login:
az loginGet the list of VM names and IP addresses:
az vm list-ip-addresses --output tableDigital Ocean
Install Digital Ocean CLI doctl:
https://github.com/digitalocean/doctl#installing-doctl
(One-time) Install on macOS with
homebrew:
brew install doctl(One-time) Login:
Authentication and context switching: https://github.com/digitalocean/doctl#authenticating-with-digitalocean
doctl auth initGet the list of VM names and IP addresses:
doctl compute droplet list --format "ID,Name,PublicIPv4"Spin New Resources
We are working on creating our IaC setup, and while that is in works you can use the Azure portal or the Azure CLI to spin new virtual machines and other resources.
Keep VMs Updated
You should keep the VMs up to date by performing updates and upgrades. This will ensure that the virtual machine is patched with the latest security fixes.
Update package information
sudo apt updateUpgrade installed packages
sudo apt upgrade -yCleanup unused packages
sudo apt autoremove -yWork on Web Servers (Proxy)
We are running load balanced (Azure Load Balancer) instances for our web servers. These servers are running NGINX which reverse proxy all of the traffic to freeCodeCamp.org from various applications running on their own infrastructures.
The NGINX config is available on this repository.
First Install
Provisioning VMs with the Code
-
Install NGINX and configure from repository.
Terminal window sudo sucd /var/www/htmlgit clone https://github.com/freeCodeCamp/error-pagescd /etc/rm -rf nginxgit clone https://github.com/freeCodeCamp/nginx-config nginxcd /etc/nginx -
Install Cloudflare origin certificates and upstream application config.
Get the Cloudflare origin certificates from the secure storage and install at required locations.
OR
Move over existing certificates:
Terminal window # Localscp -r username@source-server-public-ip:/etc/nginx/ssl ./scp -pr ./ssl username@target-server-public-ip:/tmp/# Remoterm -rf ./sslmv /tmp/ssl ./Update Upstream Configurations:
Terminal window vi configs/upstreams.confAdd/update the source/origin application IP addresses.
-
Set up networking and firewalls.
Configure Azure firewalls and
ufwas needed for ingress origin addresses. -
Add the VM to the load balancer backend pool.
Configure and add rules to load balancer if needed. You may also need to add the VMs to load balancer backend pool if needed.
Logging and Monitoring
-
Check status for NGINX service using the below command:
Terminal window sudo systemctl status nginx -
Logging and monitoring for the servers are available at:
NGINX Amplify: https://amplify.nginx.com, our current basic monitoring dashboard. We are working on more granular metrics for better observability
Updating Instances (Maintenance)
Config changes to our NGINX instances are maintained on GitHub, these should be deployed on each instance like so:
- SSH into the instance and enter sudo
sudo su- Get the latest config code.
cd /etc/nginxgit fetch --all --prunegit reset --hard origin/main- Test and reload the config with Signals.
nginx -tnginx -s reloadWork on API Instances
- Install build tools for node binaries (
node-gyp) etc.
sudo apt install build-essentialFirst Install
Provisioning VMs with the Code
-
Install Node LTS.
-
Install pnpm globally.
npm install -g pnpm- Install pm2 globally.
npm install -g pm2- Clone freeCodeCamp, set up env, and keys.
git clone https://github.com/freeCodeCamp/freeCodeCamp.gitcd freeCodeCampgit checkout prod-current # or any other branch to be deployed-
Create the
.envfrom the secure credentials storage. -
Install dependencies
pnpm install- Setup pm2
logrotateand startup on boot
pm2 install pm2-logrotatepm2 startup- Build the server
pnpm prebuild && pnpm build:curriculum && pnpm build:server- Start Instances
pnpm start:serverLogging and Monitoring
pm2 logspm2 monitUpdating Instances (Maintenance)
Code changes need to be deployed to the API instances from time to time. It can be a rolling update or a manual update. The latter is essential when changing dependencies or adding environment variables.
1. Manual Updates - Used for updating dependencies, env variables.
- Stop all instances
pm2 stop all- Install dependencies
pnpm install- Build the server
pnpm prebuild && pnpm build:curriculum && pnpm build:server- Start Instances
pnpm start:server && pm2 logs2. Rolling updates - Used for logical changes to code.
pnpm reload:server && pm2 logs3. Updating Node
-
Install new Node version
-
Update pm2 to use the new version
pm2 updateWork on Client Instances
- Install build tools for node binaries (
node-gyp) etc.
sudo apt install build-essentialFirst Install
Provisioning VMs with the Code
-
Install Node LTS.
-
Update
npmand install PM2 and setuplogrotateand startup on bootTerminal window npm i -g npm@8npm i -g pm2@4npm install -g serve@13pm2 install pm2-logrotatepm2 startup -
Clone client config, setup env and keys.
Terminal window git clone https://github.com/freeCodeCamp/client-config.git clientcd clientStart placeholder instances for the web client, these will be updated with artifacts from the Azure pipeline.
Todo: This setup needs to move to S3 or Azure Blob storage
Terminal window echo "serve -c ../serve.json -p 50505 www" > client-start-primary.shchmod +x client-start-primary.shpm2 delete client-primarypm2 start ./client-start-primary.sh --name client-primaryecho "serve -c ../serve.json -p 52525 www" > client-start-secondary.shchmod +x client-start-secondary.shpm2 delete client-secondarypm2 start ./client-start-secondary.sh --name client-secondary
Logging and Monitoring
pm2 logspm2 monitUpdating Instances (Maintenance)
Code changes need to be deployed to the API instances from time to time. It can be a rolling update or a manual update. The later is essential when changing dependencies or adding environment variables.
1. Manual Updates - Used for updating dependencies, env variables.
-
Stop all instances
Terminal window pm2 stop all -
Install or update dependencies
-
Start Instances
Terminal window pm2 start all --update-env && pm2 logs
2. Rolling updates - Used for logical changes to code.
pm2 reload all --update-env && pm2 logsWork on Chat Servers
Our chat servers are available with a HA configuration recommended in Rocket.Chat docs. The docker-compose file for this is available here.
We provision redundant NGINX instances which are themselves load balanced (Azure Load Balancer) in front of the Rocket.Chat cluster. The NGINX configuration file are available here.
First Install
Provisioning VMs with the Code
NGINX Cluster:
-
Install NGINX and configure from repository.
Terminal window sudo sucd /var/www/htmlgit clone https://github.com/freeCodeCamp/error-pagescd /etc/rm -rf nginxgit clone https://github.com/freeCodeCamp/chat-nginx-config nginxcd /etc/nginx -
Install Cloudflare origin certificates and upstream application config.
Get the Cloudflare origin certificates from the secure storage and install at required locations.
OR
Move over existing certificates:
Terminal window # Localscp -r username@source-server-public-ip:/etc/nginx/ssl ./scp -pr ./ssl username@target-server-public-ip:/tmp/# Remoterm -rf ./sslmv /tmp/ssl ./Update Upstream Configurations:
Terminal window vi configs/upstreams.confAdd/update the source/origin application IP addresses.
-
Set up networking and firewalls.
Configure Azure firewalls and
ufwas needed for ingress origin addresses. -
Add the VM to the load balancer backend pool.
Configure and add rules to load balancer if needed. You may also need to add the VMs to load balancer backend pool if needed.
Docker Cluster:
-
Install Docker and configure from the repository
Terminal window git clone https://github.com/freeCodeCamp/chat-config.git chatcd chat -
Configure the required environment variables and instance IP addresses.
-
Run rocket-chat server
Terminal window docker-compose configdocker-compose up -d
Logging and Monitoring
-
Check status for NGINX service using the below command:
Terminal window sudo systemctl status nginx -
Check status for running docker instances with:
Terminal window docker ps
Updating Instances (Maintenance)
NGINX Cluster:
Config changes to our NGINX instances are maintained on GitHub, these should be deployed on each instance like so:
-
SSH into the instance and enter sudo
Terminal window sudo su -
Get the latest config code.
Terminal window cd /etc/nginxgit fetch --all --prunegit reset --hard origin/main -
Test and reload the config with Signals.
Terminal window nginx -tnginx -s reload
Docker Cluster:
-
SSH into the instance and navigate to the chat config path
Terminal window cd ~/chat -
Get the latest config code.
Terminal window git fetch --all --prunegit reset --hard origin/main -
Pull down the latest docker image for Rocket.Chat
Terminal window docker-compose pull -
Update the running instances
Terminal window docker-compose up -d -
Validate the instances are up
Terminal window docker ps -
Cleanup extraneous resources
Terminal window docker system prune --volumesOutput:
Terminal window WARNING! This will remove:- all stopped containers- all networks not used by at least one container- all volumes not used by at least one container- all dangling images- all dangling build cacheAre you sure you want to continue? [y/N] ySelect yes (y) to remove everything that is not in use. This will remove all stopped containers, all networks and volumes not used by at least one container, and all dangling images and build caches.
Work on Contributor Tools
Deploy Updates
ssh into the VM (hosted on Digital Ocean).
cd toolsgit pull origin masterpnpm installpnpm run buildpm2 restart contribute-appUpdating Node.js Versions on VMs
List currently installed node & npm versions
nvm -vnode -vnpm -v
nvm ls
Install the latest Node.js LTS, and reinstall any global packages
nvm install --lts --reinstall-packages-from=defaultVerify installed packages
npm ls -g --depth=0Alias the default Node.js version to the current LTS (pinned to the latest major version)
nvm alias default 16(Optional) Uninstall old versions
nvm uninstall <version>If using PM2 for processes you would also need to bring up the applications and save the process list for automatic recovery on restarts.
Get the uninstall instructions/commands with the unstartup command and use the output to remove the systemctl services
pm2 unstartupGet the install instructions/commands with the startup command and use the output to add the systemctl services
pm2 startupQuick commands for PM2 to list, resurrect saved processes, etc.
pm2 lspm2 resurrectpm2 savepm2 logsInstalling and Updating Azure Pipeline Agents
See: https://docs.microsoft.com/en-us/azure/devops/pipelines/agents/v2-linux?view=azure-devops and follow the instructions to stop, remove, and reinstall agents. Broadly you can follow the steps listed here.
You would need a PAT, that you can grab from here: https://dev.azure.com/freeCodeCamp-org/_usersSettings/tokens
Installing Agents on Deployment targets
Navigate to Azure Devops and register the agent from scratch in the requisite deployment groups.
Updating Agents
Currently updating agents requires them to be removed and reconfigured. This is required for them to correctly pick up PATH values and other system environment variables. We need to do this for instance updating Node.js on our deployment target VMs.
-
Navigate and check status of the service
Terminal window cd ~/azagentsudo ./svc.sh status -
Stop the service
Terminal window sudo ./svc.sh stop -
Uninstall the service
Terminal window sudo ./svc.sh uninstall -
Remove the agent from the pipeline pool
Terminal window ./config.sh remove -
Remove the config files
Terminal window cd ~rm -rf ~/azagent
Once You have completed the steps above, you can repeat the same steps as installing the agent.
Flight Manual - Email Blast
We use a CLI tool to send out the weekly newsletter. To spin this up and begin the process:
-
Sign in to DigitalOcean, and spin up new droplets under the
Sendgridproject. Use the Ubuntu Sendgrid snapshot with the most recent date. This comes pre-loaded with the CLI tool and the script to fetch emails from the database. With the current volume, three droplets are sufficient to send the emails in a timely manner. -
Set up the script to fetch the email list.
Terminal window cd /home/freecodecamp/scripts/emailscp sample.env .envYou will need to replace the placeholder values in the
.envfile with your credentials. -
Run the script.
Terminal window node get-emails.js emails.csvThis will save the email list in an
emails.csvfile. -
Break the emails down into multiple files, depending on the number of droplets you need. This is easiest to do by using
scpto pull the email list locally and using your preferred text editor to split them into multiple files. Each file will need theemail,unsubscribeIdheader. -
Switch to the CLI directory with
cd /home/sendgrid-email-blastand configure the tool per the documentation. -
Run the tool to send the emails, following the usage documentation.
-
When the email blast is complete, verify that no emails have failed before destroying the droplets.
Flight Manual - Adding news instances for new languages
Theme Changes
We use a custom theme for our news publication. Adding the following changes to the theme enables the addition of new languages.
- Include an
else ifstatement for the new ISO language code insetup-locale.js - Create an initial config folder by duplicating the
assets/config/enfolder and changing its name to the new language code. (en—>esfor Spanish) - Inside the new language folder, change the variable names in
main.jsandfooter.jsto the relevant language short code (enMain—>esMainfor Spanish) - Duplicate the
locales/en.jsonand rename it to the new language code. - In
partials/i18n.hbs, add scripts for the newly created config files. - Add the related language
day.jsscript from cdnjs to the freeCodeCamp CDN
Ghost Dashboard Changes
Update the publication assets by going to the Ghost dashboard > settings > general and uploading the publications’s icon, logo, and cover.